
Published 10 October 2026, Updated 10 October 2026
A course area is a family of e-courses, usually one subject or one programme (for example “PPL PGI”, “CPL Theory”, “AirRichelieu OPS”). Each course belongs to one area. The area decides:
- how courses are grouped in the Course area filter and on the mobile version, where members browse by area;
- who can manage the courses (Responsibles);
- who can validate their content (Reviewers).
Viewing the course areas
Open the Course area section of the Filters panel. In the manager view, each area shows:
- a recycle bin (delete) and a blue pen (modify) when you manage that area;
- the number of courses in brackets;
- areas without any course listed after the others;
- the Add a new area link at the bottom.
Adding a course area
- Open Course area and click Add a new area.
- Fill in the window Add Course area:
| Field | Purpose |
|---|---|
| Title | The area name shown to members (filter, mobile list). Keep it short and clear, for example “PPL Theory”. |
| Description | A sentence that explains the area. It is shown under the area name on the mobile version and as a tooltip on the computer. |
| Responsibles | Members who can manage the courses of this area. Type at least two letters of a name in Search…, pick the member, then click Add. |
| Reviewers | Members who can validate content changes in this area. Same method. |
- Click Add.
When you create an area, you are automatically added as Responsible and Reviewer. Remove yourself with the small x next to your name if needed.
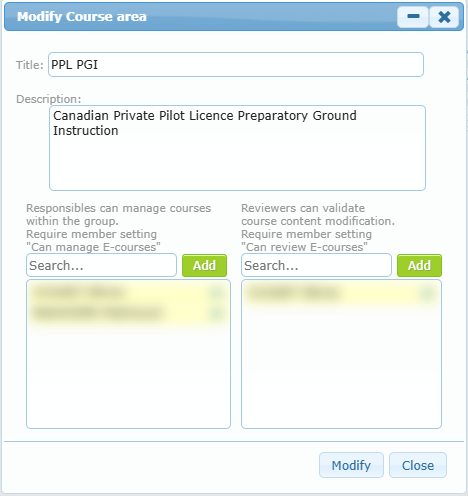
Modifying a course area
Click the blue pen next to the area. The window Modify Course area opens with the current values. Change the title, description or the lists of people, then click Modify. Click Close to leave without saving.
To remove a person, click the small x at the right of the name.
Deleting a course area
Click the recycle bin next to the area and confirm with Delete in the message “Are you sure you want to delete this course area. If it is related to any courses, it will be set as inactive!”.
- An area without courses is deleted.
- An area that still contains courses is set as inactive. Click the undo arrow next to it to reactivate it.
Tip: move the courses to another area first (see Advanced view › Move Courses to Area) if you really want to retire an area.