
Published 8 October 2026, Updated 9 October 2026
Once a lesson has been recorded in a student's course, most of its content can no longer be changed freely. This protects the training record: dates, aircraft, durations, results, and signatures stay exactly as they were saved. When something was recorded incorrectly, the instructor who recorded the lesson sends a correction request. The members designated as lesson correctors for that course review the request, make the change, and close the request.
This guide covers both sides of that workflow:
- Requesting a correction from a recorded lesson (for instructors).
- Processing requests on the Lesson correction requests page in the Courses Center (for correctors).
1. Who Does What
| Role | What they can do | How the role is given |
|---|---|---|
| Instructor who recorded the lesson | Sends a correction request for that lesson | Automatic for the lesson's instructor, provided the course has at least one designated corrector |
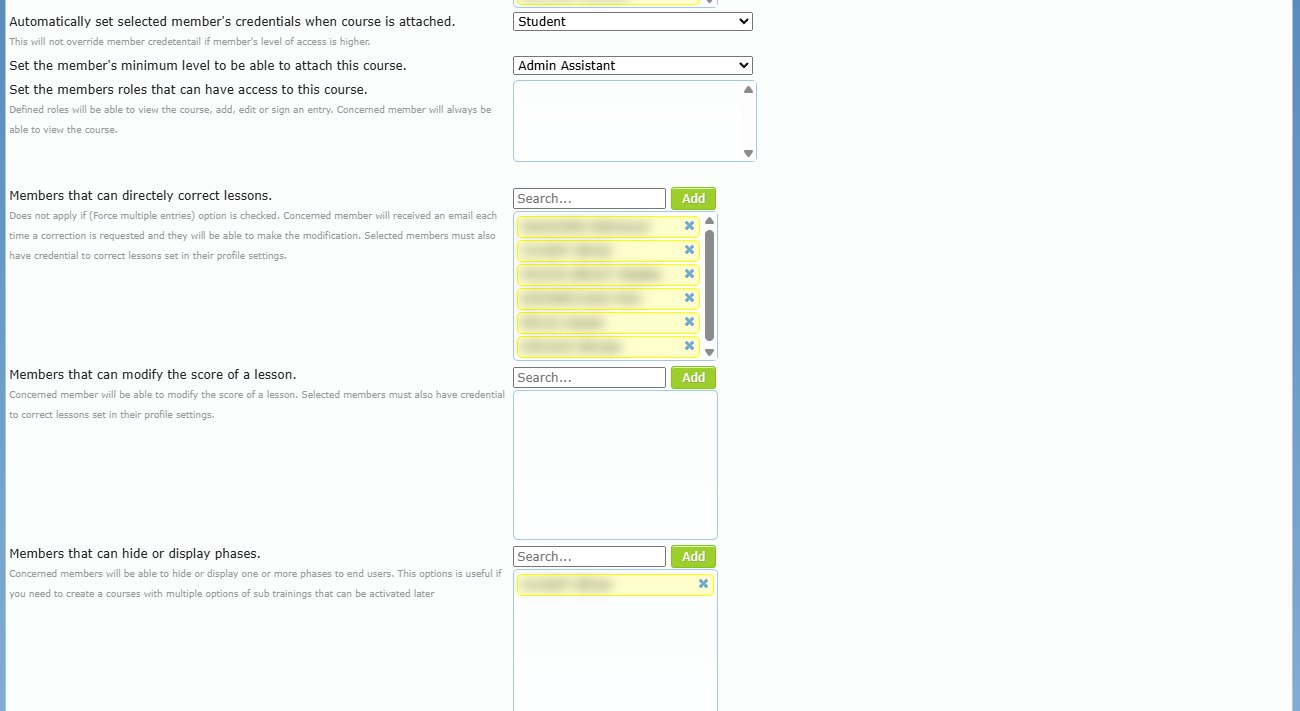
| Lesson corrector | Opens the Lesson correction requests page, receives request emails, reviews and closes requests | Listed in the course setting Members that can directly correct lessons (Course Design Center) on at least one active course |
| Corrector with Can modify or delete a lesson | Changes the lesson's details while a request is open | Profile option in the Courses group |
| Corrector with Can modify a lesson status | Switches the lesson between passed and not passed while a request is open | Profile option in the Courses group |
| Senior administrator | Can request corrections on any lesson and change lessons directly at any time | Administrator access level |
Good to know: Being listed as a corrector gives access to the request page and to request emails. To actually change a lesson, the corrector also needs one of the two profile options above.
When to set this up
Add one or two reliable people (for example the chief instructor, a training administrator, or a records officer) to Members that can directly correct lessons in each course. If a course has no corrector, instructors do not see the Request correction button on its lessons. Only a senior administrator can then correct them.
2. Requesting a Correction (Instructors)
2.1 Where to find the button
Open the student's course record, then open the lesson that was recorded. Under the lesson's action buttons, click Request correction.
The button is shown only when all of the following are true:
- The lesson has already been recorded (it is not a new, unsaved lesson).
- You are the instructor who recorded it, and the course has at least one designated corrector. Senior administrators always see the button.
- The lesson is not a copy displayed in a co-pilot's record. Requests must be made from the original lesson.
On the mobile version, open the lesson from the course details and tap Request corr. at the bottom of the screen.
2.2 Filling in the request
A window titled Request correction of selected lesson opens. Select every item that must be changed and explain the change in the text box.
| Item | Select it when… | Example explanation |
|---|---|---|
| Date | The lesson was recorded on the wrong day | "Flight took place on March 12, not March 13." |
| Resource or aircraft | The wrong aircraft, simulator, or classroom was selected | "Aircraft should be the second Cessna, not the first." |
| Status passed or not | The lesson should be passed instead of not passed, or the reverse | "Student met all standards; mark as passed." |
| Durations | One or more recorded times are wrong | "Dual time 1.2 h, not 2.1 h. Night time 0." |
| Remove signatures to edit | The lesson was signed and the signatures must be removed so it can be edited | "Signatures must be removed to correct the debrief text." |
| Delete everything | The whole lesson was recorded by mistake and must be removed | "Lesson recorded in the wrong student's course." |
On mobile, the same items are shown as on/off switches with short hints: Provide a new date, Provide a resource ID, Yes/No, and Detail occurrences.
Short description of the modification to do accepts up to 300 characters. The counter under the box shows how many characters remain. Be precise: the corrector relies on this text to make the change.
Click Request correction to send, or Cancel to close without sending. On mobile, tap Send request!
2.3 Validation rules
A request is accepted only when:
- At least one item is selected, and
- The description is not empty.
If either is missing, the request is not recorded and the message "No request for modification has been sent! Try later!" appears. Open the window again and complete both parts. On mobile, the screen stays open without sending; check your selections and description, then tap Send request! again.
2.4 What happens after sending
When the request is accepted:
- A confirmation window shows "Request has been sent!"
- All correctors of the course receive an email titled Request for lesson modifications. It includes your name and contact details, the course, the lesson, the lesson control number and date, the student's name and contact details, the items you selected, and your explanation.
- The request is added to the lesson's history as Request lesson modifications, with the selected items and your text.
- The request appears in the Lesson correction requests list as an open request.
Tip: Send one request per lesson and include every change in it. The corrector sees all selected items together and can fix them in one visit.
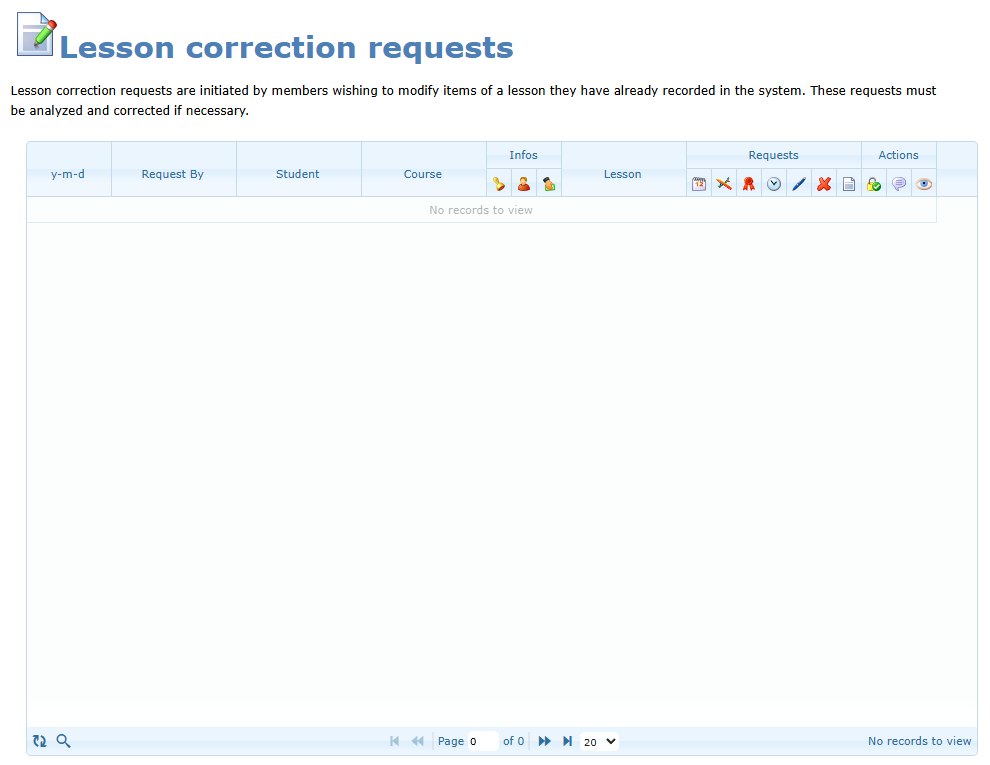
3. The Lesson Correction Requests Page (Correctors)
3.1 Opening the page
In the Courses Center, choose Lesson correction requests. The page is available only to members listed as correctors on at least one active course. Other members are redirected to the access-denied page.
The page shows a short reminder of its purpose and a list of requests. The list includes requests from all courses, not only the courses where you are a corrector. Use the Course filter to focus on your own courses.
3.2 Reading the list
Each row is one request. The newest requests are shown first. Columns are grouped under three headings: Infos, Requests, and Actions.

Main columns
| Column | What it shows |
|---|---|
| y-m-d | Date the request was made. Dates in the current year show as month and day; older dates include the year. |
| Request By | The member who sent the request. Hover the ID card icon to see their contact card. |
| Student | The student whose course contains the lesson. Hover the ID card icon for contact details. |
| Course | Course name. Hover to see the course description. |
| Lesson | Lesson name. Hover to see the lesson description, the activity date, and the resource used. If accounting has already accepted the activity, the tooltip says so and reminds you that a change of total duration should be notified. A struck-through Lesson deleted means the lesson no longer exists. |
Infos group (icons)
| Icon | Meaning |
|---|---|
| Rubber stamp | The lesson must be passed before the student can continue |
| One person / two people | Solo activity / dual (instructor and student) activity |
| Hand with money | The lesson's accounting activity has already been accepted |
Requests group — a check mark shows each item the requester selected:
| Icon | Requested change |
|---|---|
| Calendar | Correct the date |
| Small aircraft | Change the resource |
| Certificate | Switch passed or not passed |
| Clock | Change durations |
| Blue pen | Remove all signatures |
| Delete | Delete the whole lesson |
| Document | Request text. Hover the icon to read the requester's explanation. |
Actions group
| Icon | Action |
|---|---|
| Lock | Close or reopen the request (see 3.5) |
| Message | Send a message to the requester |
| Eye | Open the lesson in the student's course, in a new window |
3.3 Searching and filtering
By default the list shows open requests only. The search row is hidden until you click the magnifier button at the bottom of the list.
| Filter | How it works |
|---|---|
| y-m-d (date) | Click the field to open a date-range picker. Choose a preset such as Today, Last 7 Days, This Month, Last Year, or All time, or select a custom range, then click Filter. |
| Request By, Student, Course, Lesson | Type text. Use the small operator menu to choose how it matches, for example contains, equal, begins with, ends with, or does not contain. The list updates as you type. |
| Rubber stamp | Any, Not Mandatory, or Mandatory |
| One/two people | Any, Dual, or Solo |
| Lock | Open (default), Closed, or All |
Clicking the magnifier again hides the search row and clears all filters, returning to open requests.
You can sort by Request By, Student, Course, or Lesson by clicking the column title. Use the controls at the bottom to change pages, show 10, 20, 30, 50, or 100 rows per page, or refresh the list.

3.4 Processing a request
Follow this workflow for each open request:
- Read the request. Check the selected items and hover the document icon to read the explanation.
- Check the context. Hover the lesson name. If accounting has already accepted the activity, plan to notify accounting of any change in total duration.
- Open the lesson. Click the eye icon. The student's course opens in a new window on that lesson.
- Make the change. While the request is open, Direct change icons appear next to the lesson's fields. Click one to change that field. Correctors with Can modify or delete a lesson can change the lesson details. Correctors with Can modify a lesson status can switch passed / not passed.
- Ask for details if needed. Click the message icon. The messaging page opens in a new window with the requester already selected as recipient.
- Close the request. Return to the list and click the lock cell (see 3.5).
Important: The Direct change icons are available only while the lesson has an open request. Closing the request removes them for correctors. Make all changes first, then close.
3.5 Closing and reopening a request
Click the lock cell in the request row. The change is immediate and there is no confirmation window:
- Open → Closed: the request is marked as closed, with the date and your name. With the default Open filter, the request disappears from the list.
- Closed → Open: set the lock filter to Closed or All, then click the lock cell again. The closing date and name are removed and the lesson can be corrected again.
A closed request shows a lock icon. Hover it to see Close the: (date and time) and By: (who closed it).
Note: Closing a request does not send an email to the requester. If they need to know the result, use the message icon before or after closing.
4. Where Requests Appear Elsewhere
| Place | What you see |
|---|---|
| Course record → lesson history | Request lesson modifications entry with the selected items and explanation |
| Logbook in the course record | Correctors and senior administrators see an extra column marking activities for which a modification was requested (document with pen icon: This activity has requested to be modified!) |
| Course record → lesson | Direct change icons for authorized correctors while a request is open |
| Correctors' email inbox | Request for lesson modifications email for each new request |
5. Practical Examples
Wrong aircraft recorded
An instructor recorded a lesson on the wrong aircraft. They select Resource or aircraft and write "Should be the second Cessna, registration ending in -AB". The chief instructor receives the email, clicks the eye icon, uses Direct change on the resource, and closes the request.
Signed lesson needs a text change
The lesson was signed electronically, so it cannot be edited. The instructor selects Remove signatures to edit and explains which text is wrong. After the corrector removes the signatures, the lesson can be completed again and re-signed.
Lesson recorded in the wrong course
The instructor selects Delete everything and explains where the lesson should have been recorded. The corrector deletes the lesson and closes the request. In the list, the lesson then shows as Lesson deleted. The instructor records the lesson again in the correct course.
Duration change after accounting acceptance
The lesson tooltip says the accounting activity has been accepted. The corrector changes the durations and then informs accounting so that the billed or paid time can be adjusted.
6. Checklist for Correctors
- Review open requests regularly (keep the lock filter on Open).
- Read the request text before opening the lesson.
- Check whether accounting has already accepted the activity.
- Make every requested change while the request is still open.
- Contact the requester if the explanation is unclear.
- Close the request once the lesson is correct.
- Inform the requester of the result when needed.
7. Troubleshooting
| Problem | Likely cause and solution |
|---|---|
| The Request correction button is missing | The course has no designated corrector, you are not the instructor who recorded the lesson, the lesson is not saved yet, or you are viewing a co-pilot copy. Ask a course administrator to add a corrector, or open the original lesson. |
| "No request for modification has been sent! Try later!" | No item was selected or the description was empty. Select at least one item and write an explanation. |
| I cannot open Lesson correction requests | You are not listed as a corrector on any active course. Ask a course administrator to add you to Members that can directly correct lessons. |
| The page lists requests from courses I do not manage | The list includes all courses. Filter on Course to see only yours. |
| A request I just closed disappeared | The default filter shows open requests only. Set the lock filter to Closed or All. |
| No Direct change icons on the lesson | The request is closed, or your profile lacks Can modify or delete a lesson / Can modify a lesson status. Reopen the request or ask an administrator to grant the option. |
| The lesson shows Lesson deleted | The lesson was removed (for example by a Delete everything correction). Close the request if the deletion was intended. |
| My filters vanished | Hiding the search row with the magnifier clears all filters. Show the row again and re-enter them. |