
Published 9 October 2026, Updated 9 October 2026
The Projects window opens automatically when you open the page. You can reopen it at any time with the Projects button (folder icon) below the calendar.
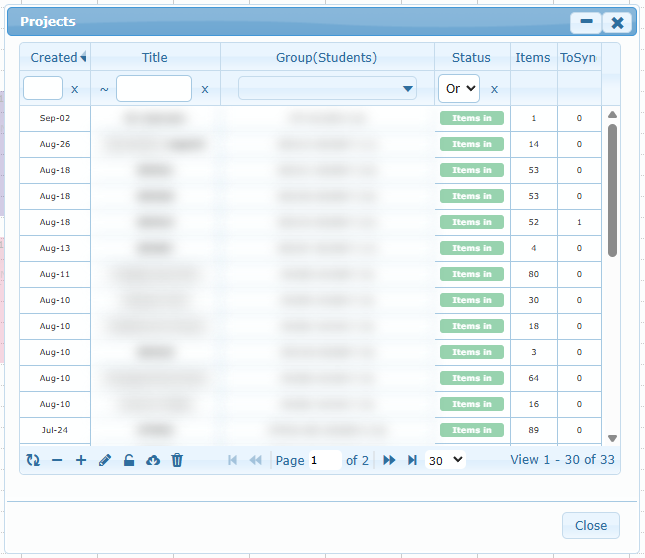
The project list
| Column | What it shows |
|---|---|
| Created | Creation date. Click the filter cell to pick a date range. |
| Title | Project name. |
| Group(Students) | The student group the project plans for. You can filter by one or more groups. |
| Status | Filter with: all, No items, items in, Closed, Only open (default). |
| Items | Total number of lessons in the project. |
| ToSync | Number of lessons not yet synchronized. |
By default, only open projects are listed and the newest appear first.
Buttons at the bottom of the Projects window
| Icon | Name | What it does |
|---|---|---|
| Circular arrows | Refresh | Reloads the list. |
| Minus | Delete or Close a Project | Deletes the selected project if it is empty. If it already contains lessons, the project is closed instead, so its history is kept. There is no confirmation. |
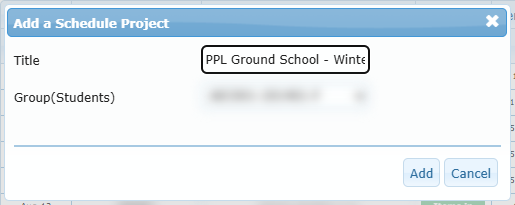
| Plus | Add a Project | Opens Add a Schedule Project. |
| Pencil | Edit a Project | Changes the title or group of the selected project. Closed projects cannot be edited. |
| Open padlock | Reopen project | Reopens a closed project. |
| Cloud with down arrow | Load the project | Opens the selected project in the scheduler. Double-clicking a row does the same. |
| Trash | Empty the selected project | Removes the remaining non-synchronized lessons after a confirmation. Lessons already published in the live scheduler are not deleted there. |

Create a project
- Click the plus icon.
- Enter a Title, such as “PPL Ground School – Group 12 – Winter”.
- Select the Group (Students).
- Click Add.
The title is mandatory. If it is empty, you see “Error adding record – Check your data!”. The new project appears in the list (status No items). Load it to start planning.
Load, edit, close, and reopen
- Load: select the row and click the cloud icon, or double-click the row. Any open planning windows close, and the calendar shows the project.
- Edit: select the row and click the pencil, change the title or group, then click Modify. The project reloads automatically.
- Close: select the row and click the minus icon. A closed project stays readable, but any change is refused with “This project can not be modified! It is Closed!”.
- Reopen: set the Status filter to Closed or all, select the project, and click the padlock.
When to close a project: close it when the course is finished and every lesson has been synchronized. It disappears from the default Only open list, but you can still view it.
Messages you may see
| Message | Cause |
|---|---|
| “Please select a Project to load.” / “…to edit.” / “…to delete.” | No row was selected before you clicked the button. |
| “This Project is Closed!” | You tried to edit a closed project. Reopen it first. |
| “Please select a Closed Project to Reopen.” | The selected project is not closed. |