
Published 1 February 2023, Updated 22 October 2026
Some text boxes in AirSupervision are simple typing areas with a row of buttons above them. In these boxes, the formatting is written with short codes between square brackets, called BBCode (from “Bulletin Board Code”, the system used by many internet forums). For example, typing [B]Important[/B] shows the word Important in bold once the text is displayed, sent by email or printed as a PDF.
You do not need to learn the codes by heart: the buttons above the box write them for you. This chapter explains how the buttons work, the few rules to respect, and what each code does.
Tip: Many screens now use the VisualText editor, where you see the formatting directly (see the chapter “Using VisualText module”). The BBCode buttons appear in the other text boxes.
The BBCode toolbar
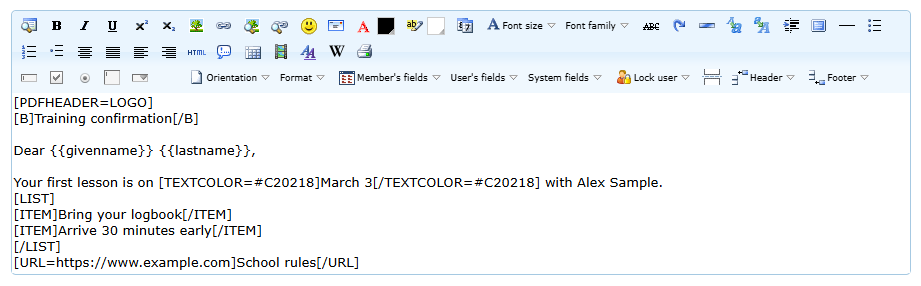
Depending on the screen, a text box shows one, two or three groups of buttons:
| Group | Where you see it | What it contains |
|---|---|---|
| Basic buttons | Every text box with a toolbar. | Bold, italic, underline, pictures, links, smileys, email links, colours and dates. |
| Extended buttons | Boxes used for longer texts (messages, memoranda, documents…). | Font size and font, lists, alignment, tables, lines, symbols, YouTube videos, Wikipedia search and a PDF preview. |
| Printing buttons | Boxes that produce PDF documents. | Form fields, page format and orientation, personalised fields, header, footer, new page and access level. |

Hover over a button to see its name or the code it writes.
How the buttons work
Most buttons work in one of three ways:
- Select text, then click. The button surrounds the selected words with an opening code and a closing code. Example: select “urgent”, click Bold, and the box shows [B]urgent[/B].
- Click without selecting. The button writes an empty pair of codes at the cursor, for example [B][/B]. Type your text between the two codes.
- Choose in a list. Buttons with a small arrow (date, font size, smileys, fields…) open a list. Click an entry to add it at the cursor.
The codes stay visible while you type. They are converted into formatting only when the text is shown to the reader, sent by email or printed.
Example
You type:
Your lesson is on [B]March 3[/B] at [TEXTCOLOR=#C20218]8:00[/TEXTCOLOR=#C20218].
The reader sees “Your lesson is on March 3 at 8:00″, with “8:00” in red.
Rules to respect
BBCode is simple, but a small typing mistake means the code is shown as typed instead of being converted. Check these rules when a code does not work.
| Rule | Correct | Not converted |
|---|---|---|
| Every opening code needs its closing code, with a slash. | [B]text[/B] | [B]text |
| For size, font and colours, the value is repeated in the closing code. | [SIZE=16]text[/SIZE=16] | [SIZE=16]text[/SIZE] |
| Colours are written as a 6-digit code starting with #. | [TEXTCOLOR=#C20218]text[/TEXTCOLOR=#C20218] | [TEXTCOLOR=red]text[/TEXTCOLOR=red] |
| A numbered list is closed with [/LIST=1]. | [LIST=1]…[/LIST=1] | [LIST=1]…[/LIST] |
| Dates in calculations are written year-month-day. | [DATE_ADD|2026-01-26|30 DAYS] | [DATE_ADD|26/01/2026|30 DAYS] |
Capital or small letters do not matter: [b] and [B] both work.
Useful colour codes:
| Colour | Code |
|---|---|
| Black | #000000 |
| Red | #C20218 |
| Orange | #E17009 |
| Yellow | #E5D31D |
| Blue | #4C80B6 |
| Light blue | #A6C9E2 |
| Grey | #999999 |
| Light yellow (background) | #FFFFCE |
The colour squares of the toolbar open a colour chooser and write the code for you.
Code reference
The table below lists every button, the code it writes and what the reader sees. In the “What to type” column, replace the words between braces, such as {text} or {url}, with your own content.
| Button and example | What to type | What it does | ||||||
|---|---|---|---|---|---|---|---|---|
| Basic buttons (always shown) | ||||||||
 Bold text | [B]{text}[/B] | Makes {text} bold. | ||||||
 Italic text | [I]{text}[/I] | Makes {text} italic. | ||||||
 Underline text | [U]{text}[/U] | Underlines {text}. | ||||||
 Superscript sampletext | [SUP]{text}[/SUP] | Raises {text} above the line (m², 1st). | ||||||
 Subscript sampletext | [SUB]{text}[/SUB] | Lowers {text} below the line (CO₂). | ||||||
 Image | [IMG]{url}[/IMG] | Shows the picture found at the internet address {url}. The address must be complete, starting with https://. | ||||||
 Link | [URL]{url}[/URL] or [URL={url}]{text}[/URL] | Makes a link to {url}. With the second form, the reader clicks {text} instead of the address. The link opens in a new window. | ||||||
 Internal image | [LIMG]{file}[/LIMG] or [LIMG WIDTH={value} HEIGHT={value} POS={LEFT/RIGHT} NOOPEN]{file}[/LIMG] | Opens the library so you can pick a public picture. Options: width and height in pixels, position on the left or right (text flows around it), NOOPEN = clicking the picture does not open it full size. Only pictures the reader is allowed to see are shown. | ||||||
 Internal documents | [LLINK]{file}[/LLINK] or [LLINK={file}]{text}[/LLINK] | Opens the library so you can pick a public file, then makes a link to it, with or without a {text} to click. | ||||||
 Smiley | 🙂 😉 🙁 (y) (ok) and more | Choose a smiley in the list. Its short code is typed in your text and replaced by the small picture when the text is displayed (when smileys are enabled for your organisation). | ||||||
 Mail | [MAILTO]{email}[/MAILTO] or [MAILTO={email}]{text}[/MAILTO] | Makes a link that opens the reader’s email program with the address {email}, with or without a {text} to click. | ||||||
 Font color text | [TEXTCOLOR={color}]{text}[/TEXTCOLOR={color}] | Changes the colour of {text}. {color} is a 6-digit colour code such as #C20218 (red) or #4C80B6 (blue). Colour names such as “red” do not work. The same code must be repeated in the closing tag. The colour square of the toolbar writes the code for you. | ||||||
 Background color text | [BGCOLOR={color}]{text}[/BGCOLOR={color}] | Colours the background behind {text}, like a highlighter. Same rules as the text colour: a 6-digit code, repeated in the closing tag. | ||||||
 Date | Pick a date in the list, or [DATE_ADD|{date}|{amount}|{format}] [DATE_SUB|{date}|{amount}|{format}] [DATE_MANIP|{date}|{change}|{format}] | The first entries write today’s date in the chosen format. “Add to date” and “Subtract to date” calculate a date: {date} as 2026-01-26, {amount} as 30 DAYS, 2 WEEKS, 6 MONTHS or 1 YEAR. “Date manipulation” accepts English expressions such as “first day of next month”. {format} is optional: Y-m-d gives 2026-01-26, d/m/Y gives 26/01/2026. The button writes today’s date as {date} and Y-m-d as {format}: change them as needed. | ||||||
| Extended buttons (includes the basic buttons) | ||||||||
 Font size text | [SIZE={value}]{text}[/SIZE={value}] | Changes the size of {text}. {value} is a number (for example 16), in pixels on screen and in points in PDF documents. The number must be repeated in the closing tag. The menu offers Tiny (9), Small (10), Normal (12), Medium (16) and Bigger (25). | ||||||
| Font family text | [FONTFAMILY={fontname}]{text}[/FONTFAMILY={fontname}] | Changes the font of {text}. Use times, helvetica or courier: these are the fonts available in PDF documents. The font name must be repeated in the closing tag. | ||||||
 Strikethrough | [STRIKE]{text}[/STRIKE] | Draws a line through {text}. | ||||||
 Break | [BR] or [BR CLEAR] | [BR] starts a new line. [BR CLEAR] starts a new line below any picture placed on the left or right. | ||||||
 Space | [SPACE={value}] | Adds {value} spaces in a row (the button adds 5). Useful to align words, because several typed spaces are shown as one. | ||||||
 Lowercase | (select text, then click) | Changes the selected text to lowercase letters. No tag is added. | ||||||
 Uppercase | (select text, then click) | Changes the selected text to CAPITAL letters. No tag is added. | ||||||
 Tab section | [TAB]{text}[/TAB] or [TAB={value}]{text}[/TAB] | Moves {text} to the right. {value} is the number of steps (for example 2). | ||||||
 Section This is a sample text | [DIV]{text}[/DIV] or [DIV BACKGROUND-COLOR={color}]{text}[/DIV] | Groups {text} in a block. Add style settings in the opening tag: BACKGROUND-COLOR for the background colour, COLOR for the text colour, for example [DIV BACKGROUND-COLOR=#FFFFCE COLOR=#C20218]. | ||||||
 Line | [HR] | Draws a horizontal line. | ||||||
 List
| [LIST] [ITEM]{text}[/ITEM] [ITEM]{text}[/ITEM] [/LIST] | Creates a bulleted list. Each item is written between [ITEM] and [/ITEM]. | ||||||
 Ordered list
| [LIST=1] [ITEM]{text}[/ITEM] [ITEM]{text}[/ITEM] [/LIST=1] | Creates a numbered list starting at 1. Note that the closing tag is [/LIST=1]. | ||||||
 List item | [ITEM]{text}[/ITEM] | One item of a bulleted or numbered list. | ||||||
 Center text | [CENTER]{text}[/CENTER] | Centres {text}. | ||||||
 Justify Text is justified | [JUSTIFY]{text}[/JUSTIFY] | Spreads {text} evenly between the left and right margins. | ||||||
 Left text | [LEFT]{text}[/LEFT] | Aligns {text} on the left (normal behaviour). | ||||||
 Right text | [RIGHT]{text}[/RIGHT] | Aligns {text} on the right. | ||||||
 Code <u>text</u> | [PRE]{text}[/PRE] | Shows {text} exactly as typed, with all its spaces, in a fixed-width font. | ||||||
 Comment | [COMMENT]{text}[/COMMENT] | A note for yourself or other editors: {text} is never displayed or printed. | ||||||
 Table
| [TABLE=BORDER,W{tablewidth}] |- !{size} {title} !!{size} {title} !!{size} {title} |- |{align} {text} ||{align} {text} ||{align} {text} |- |{align} {text} || {text} || {text} |- | {text} || {text} || {text} [/TABLE] | Creates a table. The button inserts a ready-made example: replace its words with yours. [TABLE=BORDER,W100%] : BORDER draws the cell borders, W gives the width (W100%, W400 for 400 pixels). |- = start a new row ! = first title cell, !! = next title cell (a number right after it sets the column width) | = first cell of a row, || = next cell CENTER, JUSTIFY, LEFT or RIGHT right after | or || aligns the cell. |
||||||
 Youtube | [YOUTUBE]{id}[/YOUTUBE] or [YOUTUBE SMALL]{id}[/YOUTUBE SMALL] | Adds a YouTube video that the reader can play in the page. {id} is the code at the end of the video address (after “v=”). SMALL shows a smaller player. In emails the reader sees a picture of the video with a link, in PDF documents the address of the video. | ||||||
 Symbol | ≤ ∞ € ° ± and more | Choose a symbol in the list: it is added where the cursor is. | ||||||
| Text zoom (first button) | (click) | Makes the characters of the writing box bigger or smaller while you type. It does not change the document. | ||||||
| Wikipedia search (W) | (select a word, then click) | Searches Wikipedia for the selected word, in English, French or Spanish. Click a result to read it in a new tab. Nothing is added to your text. | ||||||
| Preview (printer) | (click) | Shows your text converted into a PDF document in a new tab, so you can check the result. | ||||||
| Printing buttons (PDF documents) | ||||||||
 Input text | [PDFTEXTFIELD]{text}[/PDFTEXTFIELD] or [PDFTEXTFIELD={size}]{text}[/PDFTEXTFIELD] | Adds a one-line box the reader can fill in the PDF. {size} is its width, {text} the optional pre-filled text. | ||||||
 Checkbox | [PDFCHECKBOX]{text}[/PDFCHECKBOX] | Adds a box to tick, with {text} written on its right. | ||||||
 Radio button | [PDFRADIO={group}]{text}[/PDFRADIO] | Adds a round button with {text} on its right. Give the same {group} number (1, 2, 3…) to the buttons of one question: the reader can then choose only one of them. With 0 or no number, the button is not linked to the others. | ||||||
 Textarea | [PDFTEXTAREA]{text}[/PDFTEXTAREA] or [PDFTEXTAREA={width},{height}]{text}[/PDFTEXTAREA] | Adds a large box for several lines, with an optional {width} and {height} and a pre-filled {text}. | ||||||
 Select box | [PDFCOMBO={width}]{items}[/PDFCOMBO] | Adds a list of choices. Write {items} as code=text pairs separated by semicolons, for example A=Single engine;B=Multi engine;C=Simulator. | ||||||
 Orientation | [PDFORIENTATION={orientation}] | Put it at the very beginning of the document. P = portrait, L = landscape. | ||||||
| Format | [PDFSIZE={format}] | Put it at the very beginning of the document. LETTER = 8.5 × 11 in, LEGAL = 8.5 × 14 in, TABLOID = 11 × 17 in, A4 = 210 × 297 mm, A3 = 297 × 420 mm. | ||||||
 Lock user | [PDFUSERLOCK={level}] | Only members whose level is at least {level} can produce the document. Other members see “You are not allowed to read this document.” Choose the level in the list. | ||||||
 New page | [PDFNEWPAGE={orientation} {format}] | Starts a new page, for example [PDFNEWPAGE=P A4]. The button uses the orientation and format last chosen in the Orientation and Format menus (portrait LETTER if none was chosen). | ||||||
 Page header | [PDFHEADER={type}] | Put it at the beginning of the document. NO = no header, LOGO = company logo, LOGOBIG = big logo, COMPLET = logo and title, COMPLETDATE = logo and printing date. | ||||||
 Page footer | [PDFFOOTER={type}] | Put it at the beginning of the document. NO = no footer, NORMAL = page number / total pages, INITIAL = page number with 2 places for initials, CUSTOM = organisation address centred, CORRECT = page number with “I certify this page correct” and name, licence and signature. | ||||||
| Signature | [SIG={member number} WIDTH={value}] | Adds the stored signature of a member, {value} pixels wide. The button inserts [SIG=1 WIDTH=20]: replace 1 with the member number given by your administrator. Nothing is shown if the member has no stored signature. | ||||||
| Member’s fields, User’s fields, System fields | {{lastname}}, {{my_lastname}}, {{company_name}}… | Adds personalised information that is filled in when the document is produced. See the chapter “Using dynamic text”. |
Building a table
The Table button inserts a ready-made example. Replace its words (titre, ligne, cell) with yours.
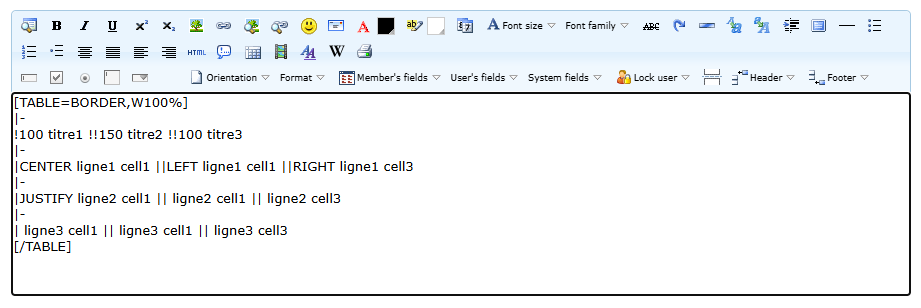
Each line has a meaning:
| Line | Meaning |
|---|---|
| [TABLE=BORDER,W100%] | Start of the table. BORDER draws the cell borders, W100% makes the table as wide as the page (W400 means 400 pixels). |
| |- | Start of a new row. |
| !100 Name !!150 Date | A row of title cells: ! starts the first title cell, !! the next ones. The number right after ! or !! is the column width. |
| |CENTER Alex ||LEFT March 3 | A row of normal cells: | starts the first cell, || the next ones. CENTER, LEFT, RIGHT or JUSTIFY right after | or || aligns the cell. |
| [/TABLE] | End of the table. |
Example: a small table with a title row and two lines.
[TABLE=BORDER,W60%]
|-
!150 Aircraft !!100 Hours
|-
| C-FAKE ||RIGHT 12.5
|-
| C-TEST ||RIGHT 8.0
[/TABLE]
Calculating dates
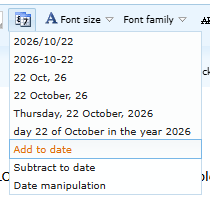
The first six entries write today’s date as fixed text. The last three entries write a calculation that is done when the text is displayed:
| Entry | Code written | What to change |
|---|---|---|
| Add to date | [DATE_ADD|2026-10-22|30 DAYS|Y-m-d] | The start date (today’s date is written for you), the amount to add (30 DAYS, 2 WEEKS, 6 MONTHS, 1 YEAR) and the format. |
| Subtract to date | [DATE_SUB|2026-10-22|30 DAYS|Y-m-d] | Same as above, the amount is subtracted. |
| Date manipulation | [DATE_MANIP|2026-10-22|first day of next month|Y-m-d] | The start date and an English expression such as “first day of next month” or “last day of this month”. |
The last part is the format of the result. Keep Y-m-d, replace it with another format, or delete it together with the | before it (Y-m-d is then used):
| Format | Result for January 26, 2026 |
|---|---|
| Y-m-d | 2026-01-26 |
| d/m/Y | 26/01/2026 |
| m/d/Y | 01/26/2026 |
| j F Y | 26 January 2026 |
Example: [DATE_ADD|2026-01-26|6 MONTHS|j F Y] shows “26 July 2026”.
Pictures, files and videos
- Image shows a picture from the internet. Paste the full address of the picture between [IMG] and [/IMG].
- Internal image opens the library window. Click a picture to see it on the right, set the width, height and position if needed, choose whether clicking the picture opens it full size, and click Select. Only public pictures can be used, and readers only see pictures they are allowed to open.
- Internal documents opens the library window. Click a file and click Select to add a link to it.
- YouTube adds a video: type the video code (the end of the YouTube address, after “v=”) between [YOUTUBE] and [/YOUTUBE]. On screen the reader can play the video directly in the page. Write [YOUTUBE SMALL]…[/YOUTUBE SMALL] for a smaller player. In emails the reader sees a picture of the video with a link; in PDF documents, the video address.
Common problems and solutions
| Problem | Why it happens | What to do |
|---|---|---|
| The reader sees the code, for example [B]text, instead of bold text. | The closing code is missing or misspelled. | Add the closing code with its slash: [/B]. |
| A colour does not work. | A colour name was used, or the closing code does not repeat the colour. | Use a 6-digit code such as #C20218 and repeat it in the closing code. |
| A size or font change does not work. | The closing code does not repeat the value. | Write [SIZE=16]text[/SIZE=16], [FONTFAMILY=times]text[/FONTFAMILY=times]. |
| A calculated date is not shown, and the code stays visible. | The start date is not written year-month-day, or the amount is misspelled. | Write the date as 2026-01-26 and the amount in English, for example 30 DAYS or 6 MONTHS. |
| My spaces disappear. | Several typed spaces are shown as one. | Use [SPACE=5] or the Space button. |
| An internal picture is not shown to some readers. | The picture is not public, or the reader is not allowed to open it. | Choose a public picture in the library. |
| A signature does not appear in the PDF. | The member has no stored signature, or the number is wrong. | Check the member number in [SIG=…] with your administrator. |
| The PDF says “You are not allowed to read this document.” | The document is locked to a higher level. | Ask a member with the required level, or change the [PDFUSERLOCK] code. |
Quick best practices
- Use the buttons rather than typing the codes yourself: they always write the closing code.
- Select your text first, then click the button.
- Click the Preview button (printer) to check the result before saving or sending.
- Keep codes simple: one style at a time is easier to correct than many codes nested together.
- For new documents, prefer the VisualText editor when the screen offers it.